Friday, August 29, 2014

When You've Gotta Go

When we were in the Northwest this summer we suffered some equipment degradation. Still had half a handle for the all important black tank drain valve, and a pair of vice-grips in the tool box in case the second half of the handle failed. It was clear that I would have a maintenance project when we got home.

Knowing what I was facing, we did an especially good job of flushing and cleaning the tank before we left our full hookup site the day before we got home, and then put the toilet off limits.

It really was a simple, 15 minute job, made much easier because unlike Nina, I didn't have neighbors watching my every move. (Seriously, check out Nina's seriously funny post from a couple years ago.) One bolt was a bit challenging to access, but not a big deal. The new valve has an aluminum handle. Seems much less likely that part of it will break off.

Tuesday, August 26, 2014

Close the Door

One of the "features" of Scamp trailers that many people find inadequate is the door latch. It has several functional drawbacks and has been known to fail internally, locking people in or out of the trailer.

Several people on the Scampers Yahoo Group have replaced their door latch with one from Fastec Industries. I ended up using one that looks the same but was made by Bauer Products and distributed by AP Products since it was available at my local RV parts store.

While I was cutting other holes in the trailer, I cut a hole for the new style latch assembly and removed the old striker plate.

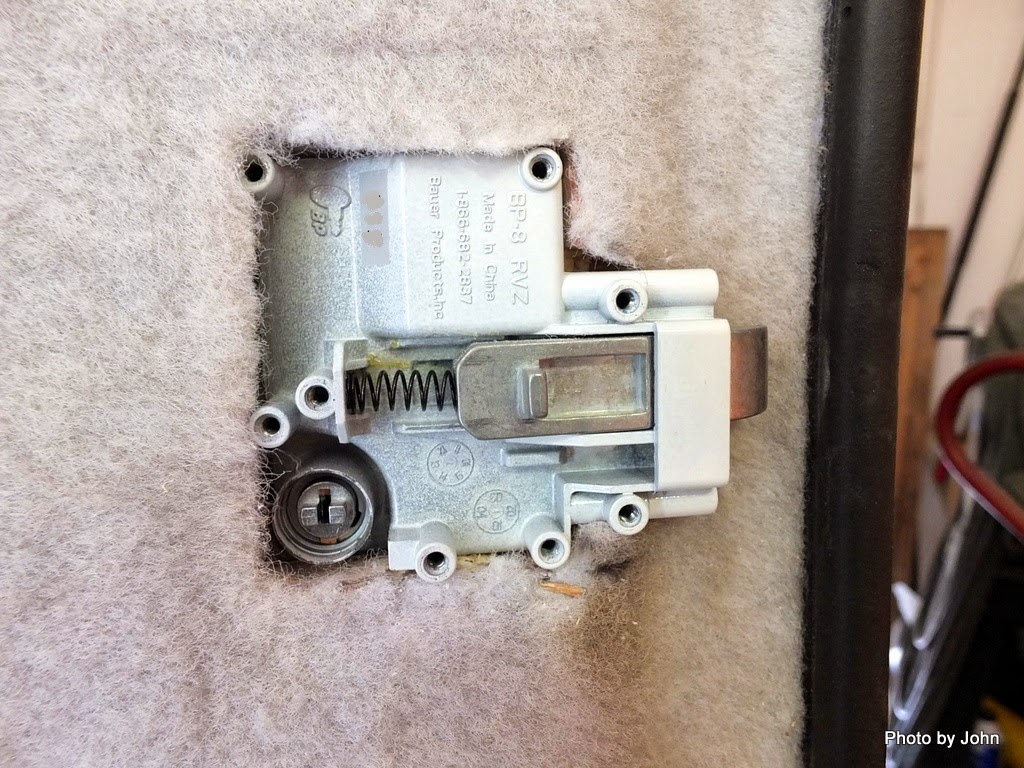
The hole clearances were tight enough that I had to disassemble the deadlock function of the assembly in order to rotate the latch assembly into position in the door. Both the plate and the deadbolt shaft had to removed temporarily.

With the deadbolt parts out the way temporarily, the latch assembly slips into place.

With the latch assembly in plate, the deadbolt parts and the flat plate that retains them in position were reinstalled.

I knew that the latch was designed for a thicker door, so I started out making a spacer from 1/4" Baltic birch. It wasn't thick enough, so I made a second one and stacked them but it still was not quite tight enough. The third version was made from a piece of Baltic birch plywood that was about 11/16" thick.
The spacer has some fancy curves since I didn't get it right the first time, but you can't see them after it is all assembled. I won't tell if you don't.

Since I had some epoxy left over from the last boat project, I coated the spacer with a coat of epoxy to seal it and did the same to the edges of the cutout in the door. This way, if the sealant under the flange of the door latch should fail, any moisture will not be absorbed by the OSB incorporated into the core of the door.

I applied a bead of Dicor non-sag sealant to the latch flange before inserting it into the door for the last time.

The screws were replaced with stainless screws that were 1/4" longer to allow for the thick spacer. The AP Products latch uses a plastic pull plate. It appears that some of the Fastec Industries latches use a nicer metal pull plate. If I were to do the project again, I'd order a Fastec latch but I'm comfortable that the AP assembly will serve us well.

The new striker plate was fabricated from a piece of 1-1/4" x 1/8" stainless strap that I then painted black. The washer-head screws screw through the cabinet wall into a backer block of Baltic birch. I still have to touch up the door flange and paint the screw heads.

For Scamp owners that review this one closely, you'll note that our door seal is mounted to the door itself instead of glued to the trailer body in the factory stock manner. When I did the seal swap several years ago, the seal was available locally. I've never seen a source for it on line, and I don't know if the T-2 seal is still available at Space Age Paints or not.

Saturday, August 23, 2014

Range Hood Exhaust Vent

One of the holes that I cut in the Scamp was for a range hood exhaust vent. At this point, Casita owners might be perplexed since a range hood is standard equipment on all models of the Casita. It's a rarely selected option on Scamps, and like most, our Scamp didn't have a range hood.

I elected to use the JR Products vent because it is more robust, has a better latching system, and conceals the mounting screws for a cleaner installation than the more common (and cheaper) Ventline unit. Like the Ventline, it is available in two collar lengths. I used the 5/8" deep collar because of the thin wall on molded fiberglass trailers.

The weather shield is separate from the vent itself. After checking for fit (this hole was a great fit the first time), I removed the blue tape that I'd used to outline the hole, applied a bead of Dicor non-sagging caulk to the back of the vent flange and installed it using the screws that were too short to install the new taillights.

This is what it looks like right now on the inside. The LED light will be repositioned when I build the range hood, but I can't do that until the slow boat from China shows up with the fans. At that point, the short screws currently holding the vent in place will be replaced with longer ones that will hold the fabricated hood in place as well.

This is what it looks like on the outside with the weather cover in place. JR Products says it is non-yellowing. They must not have made the "porch" light  fixture! I'll get that fixed one of these days with a roll of masking tape and some spray paint.


Wednesday, August 20, 2014

I Don't Believe in Darwin

A couple days ago I was driving to Miami. If you are thinking waves, warmth, and babes in bikinis, you get one out of three right. It was definitely warm but no water or bikinis in sight. Just lots of open pit copper mine excavations and mountains of tailings from a hundred years of copper mining.

The town's welcome sign makes a claim that doesn't seem accurate any way you try to explain it. I guess it's nice they think they're the center of the world even if it is only in their dreams... but that's not the reason I don't believe in Darwin.

Photo used under Creative Commons license
thanks to Monsieur Lui at
https://www.flickr.com/photos/monsieurlui/316350341
On the way home, I was overtaking a car on Highway 60 when the driver moved from the right hand lane to the passing lane for no apparently reason, forcing me to pass her on the right while she continued merrily on her way in the passing lane about 5 mph below the speed limit.

I watched in my rear view mirror as she wandered slowly from one side of the lane to the other, and as she would drift back as far as 15 car lengths and then speed up, almost catching me before starting to drift back again, all the while in the passing lane.

After nearly ten miles of this, with traffic passing her on the right and then switching to the passing lane to pass me, she sped up over the speed limit to finally pass me. At that point I was able to observe that she was talking on her cell phone held to her ear in her left hand while she chewed on the fingernails of her right hand. Apparently she was steering with her knees.

State legislators in Arizona make laws about a lot of strange things, but they've determined drivers are so good that they can feel free to talk on a handheld phone or text while they drive. Everyone knows if you're going to steer with your knees it needs to be for a worthwhile reason like eating a hamburger or combing your hair, not chewing your fingernails.

She successfully continued wandering down the highway until I lost sight of her in the traffic. And that's why I don't believe in Darwin.

Now I'll get off my soapbox.

Sunday, August 17, 2014

Bright Lights

For many years, Scamp has used Bargman 92 Series surface mounted taillights. The ones on our trailer included a backup light function but my truck has never been wired to support the backup lights.

I've wanted to swap for much brighter LED taillights but Bargman doesn't make a direct replacement.

I expected to see the lights mounted with rivets since rivets are used so liberally everywhere else, but in this case they used 1/2" long sheet metal screws into the fiberglass shell.

An individual on the Yahoo Scamp list mentioned he replaced his taillights with Bargman 07 series assemblies which was enough to push me to do the mod. At first, I was a bit surprised to see the wire colors didn't match until I realized the original red wire was for the backup light that these assemblies don't have. The light assemblies are available with black or white base plates.
You can tell I haven't washed the trailer since we got home from the Northwest. You can also tell that Scamp doesn't seal the base of the taillight to the shell.


I always use weather tight crimp fittings that are heat shrunk after crimping. I installed crimp caps on the extra ground and the red backup lamp supply wires.

The license plate mounting ears on the left hand assembly were different. On the old one, the area for the nut was recessed.

On the new one, it wasn't recessed, thereby creating a clearance issue. I ended up installing the license plate retaining screws backwards with the head of the screw towards the shell and the nylock nuts exposed. This will be the better solution unless we sell the trailer and the plate has to be removed.

The original lower two screw holes will be reused. The upper two will be sealed. One of the upper two is hidden behind the lamp assembly. The other original upper hole is exposed near the edge of the new lamp assembly.

I used my favorite Dicor Non-Sag sealant. It is apparently only available in caulking tubes which is overkill for this project but I'll use it on the new stove exhaust flap installation and on the new door latch as well. Dicor is also available in a "Self-leveling" formulation that works well on horizontal surfaces but not vertical surfaces.

These lights required longer screws for installation. I used 3/4" stainless screws. I used Dicor to seal around the wires coming out of the shell, all around the base of the light assembly, and to fill the two holes that weren't reused.  In addition, I put a dab of Dicor on each screw tip before installing the screw.

 I'm pretty pleased with how the installation turned out. The most noticeable difference in taillight mode is the brighter recognition light on the license plate and the larger lit area as compared to the original equipment in the first photo.

The big difference is with the brakes applied. These throw off enough light that it turns the back of the trailer pink!


Thursday, August 14, 2014

Cutting Holes

I woke up yesterday morning to thunder and rain. First worthwhile rain in our neighborhood since we got home. The best part was the thermometer was reading 69 degrees. It was time to get the garage doors cracked and the fan going to take advantage of the cool weather.
Using blue tape, I outlined holes that I needed to cut in the trailer. The one above the porch light is for an exhaust fan for the stove. The lower set is for the new door latch.

As usual, my preferred tool for cutting holes in molded fiberglass is my small router fitted with a 1/4" straight carbide tip. On the Scamp it takes a depth of about 1/8" to cut through the fiberglass structure.

The skin usually stays in place even though the cut is completed.

The Reflextix (r) insulation layer is installed with spray contact cement at the Scamp factory. That cement is what conveniently holds the structural skin in place until you peel it gently away.

A razor knife will cut through the remainder of the Reflectix and then it can be peeled away, exposing the back side of the the "rat fur."

I use a scissor to cut through the rat fur layer. It seems to cut easier that way than with a razor knife.

Needless to say, I was making a bunch of noise, but Turk was happy to stay in his favorite spot in the loft where he could watch out the window.

Cutting the notch in the door frame for the new striker plate was a bit more challenging since there wasn't a flat surface for the router. I ended up using it like an overgrown Dremel tool.

The cutout for the new latch was a two step process. The main portion was cut from the outside. It took three passes of increasing depth to cut through the door structure. Once the main piece was cut out, clearance for the latch bolt was routed out from the inside of the door.

With the holes cut, I headed off to the RV parts store for a tube of Dicor sealant, and then stopped by a used truck dealer with a measuring tape on my way to the hardware store for more bits and pieces.

One owner, low miles, and it would fit the trailer, but BJ's still on her trip and I'm smart enough to wait, I think...

Monday, August 11, 2014

Time for a Fix-Up

I came home from the summer trip with a list of mod improvements and new mods for the trailer. After a trip to a local RV parts shop, I headed to Amazon for the rest of the parts. Imagine my surprise when the invoice for fans shows a delivery date of mid-September. Must be coming from China...

Meanwhile, the pile of parts is growing. A new water pump to replace the Harbor Freight pump (it died) that I used on the proof of concept for the external water transfer pump.

I'm not looking forward to changing the black tank drain valve, but the new door latch should be a big improvement over the factory handle.

The new LED taillights arrived today and I'm expecting Monroe shocks and more parts for the custom exhaust hood to arrive tomorrow and a few more bits and pieces by the end of the week.

I haven't ordered the solar installation pieces yet - I've got to get the custom mounts fabricated first.

Saturday, August 9, 2014

Neighborhood Tour

With BJ headed for her meet-up for her annual girlfriends trip, I headed out to see what had changed in the neighborhood in the past three months. The sign, which has been there since the valley was a hotbed of pilot training before WWII looks like it may have a fresh coat of paint.

The campground at Usery was nearly empty. Too hot for camping, even with power.

The spindly ocotillo were sporting their green leaves compliments of the monsoon rains, but no bright red blossoms to be found.

It only looks soft and cuddly.

I wandered a bit further and parked at an unmarked pull-off for a short walk to the river. Dam controlled just a couple miles further upstream, the river was flowing nice today. It looked really good for a couple minutes.

It's always fun to watch. In this case, the inattentive kayakers are getting one last picture

before the downstream boat neatly flips in the micro feature locally known as Snaggle Tooth.

Meanwhile, the quiet was no more as a gaggle of tubers rounded the corner. This particular gaggle was formed around twin nuclei - one a floating boom box at full volume, and the other an ice chest which is the normal core to any tubing gaggle.

The shuttle bus at Water Users assured that there were many more gaggles and many more buses on the way.

The mountains south of the river were sporting a green tint from the recent monsoons.

They say it will only hit 102 degrees today but it still is hot enough to make me prickly.