Wednesday, January 29, 2014

My Part is Done

On Tuesday, I put in my last day of work on Helen's Dory. Tony and I started off the day sanding the chines and then installing the chine rub rails.

With the rub rails in place, we started sanding the rest of the boat. Seriously, Tony used two sanders, at least on the bottom of the boat.
We got the bottom skim coated before lunch. I used slightly thickened epoxy to overcome the significant texture - even after sanding - of the 17 oz. cloth. The thickened epoxy has a milky tint.

After lunch Tony went to work on fabricating the bow and stern handles while I continued skim coating the sides.

Not welded yet but you get the idea. The handles will bolt to the bow and stern posts using the same holes that the "flipper" attach points used.

Tomorrow, Tony will be back on the sanders, doing the final sanding to the skim coat before starting to apply the three coats of paint to the hull.

Meanwhile, I'll take my house and go home. I've got to get it cleaned up before we head to Quartzsite for the annual gathering of fiberglass trailers.


If you want to see similar dories in action, I highly recommend the Historic River Boats Afloat report of their 2012 trip through the Grand Canyon.

The boat we're building is based on the Susie Too which was built for a 1962 trip highlighting the impact that proposed dams would have in the Grand Canyon. The original Susie Too was renamed the Music Temple and used commercially in the canyon for a number of years. It now is part of the museum collection at the Grand Canyon. An Oregon built replica of the Susie Too went on the 2012 trip. Helen's boat will be painted the same, at least for this first trip.

We are planning to be at Lees Ferry for Helen's trip launching in early March. In addition to this boat, a replica of the Flavell II currently being built, and the replica of the Portola which was built for the 2012 trip will be joining her along with several rafts and catarafts. I'll make sure to post some pictures from rigging day and launch day.

Monday, January 27, 2014

Sunday - A Day of Rest

We planned to glass the sides of the dory Sunday afternoon but a quick check showed that while we had enough resin in stock we were still short the appropriate hardener. The end result was a wonderful day off. We did get the locations for the safety rope retention padeyes marked.

Locating them was a bit of a challenge - we've been working from some photos and an 8 1/2 x 11 inch survey of the original boat marked off in 1' increments. Let's just say scaling from that involves some eyestrain and guesstamation...

On Monday, we got the sides glassed.

Once I got a head start on the glassing, Tony started installation of our version of the safety rope padeyes.

It's a challenge building a boat to replicate a boat that Tony and I have never seen. We're working from photos that someone else took and typically don't highlight the details we'd like to understand. I suspect the original safety rope padeyes were either machined from solid stock or cast and then machined. We didn't have the time or the money to be that historically accurate.

Ours were molded in a jig from three layers of 17 oz fiberglass

and then cut from the resulting stock.

They're not the same, but will look similar from a distance once the boat is painted, and don't require holes in the hull to mount them.

With essentially all of the structural glassing done, I'll be headed home soon, leaving Tony and Helen to finish the project they started. Tony is an incredibly skillful guy in so many areas. Now he's learned the joy of working with scratchy fabric and sticky stuff and will be able to finish up the final glassing details on his own.


Saturday, January 25, 2014

Flip It!

We apparently raised some eyebrows with the last picture in my previous post. More than one person called Helen shortly after the post was published with "don't you know motors aren't allowed in the Canyon in March?" questions. If it were my boat and it wasn't a potential danger to a backseater, I'd be tempted to mount it permanently, as a conversation piece.

I think this is about as clean as she's been. I finished up some details with some of the hatches while Tony built some special sawhorses.

Up to this point, we've had the boat mounted on a pair of engine stands which has allowed us to rotate it as needs be. Now the attach points for the "flipper" need to be removed and it would be nice if the boat was a bit lower for the next step so two special sawhorses were constructed. The other one picks up the intersection of the back seat and rear bulkhead.

It pays to have a neighbor with a couple 4x4 laying by the fence. One temporarily became part of the lift system.

Once the boat was settled on the sawhorses, the bow and stern posts were faired, and I started marking the location of the various pieces of fiberglass that would coat the exterior of the boat. It's certainly easier to mark when you know the boat is not going to be clear finish like mine normally are.

We finished up the day by filling any screw heads or other marks.

This boat is using a fiberglass fabric that is much thicker / heavier than I normally use. Most of my boats use 4 oz fiberglass fabric (right), and occasionally I'll use 6 oz (center) if I think the boat will see some abuse. This boat is using multiple layers of much thicker and stronger 17 oz biaxial fabric.

We trimmed the four pieces that would make up the covering for the bottom of the boat and rolled them before we mixed up any resin.

The first piece is in place, ready for the resin. It's approaching 11 a.m. ...

Tony mixed batches of resin and other prep stuff while I applied the resin.

Six hours, 30 minutes later, we had four pieces on the hull as well as pieces on the bow and stern posts. So much for hoping that we might get the sides glassed today as well, or lunch for that matter!

Tony finished up the day by scarfing some wood for the chine rub rails while I worked on fabricating some parts for the safety rope retention system. Think glorified padeyes.

It's been another long day but I'm seeing my time on this one winding down. I've got another smaller boat project to help with as soon as I'm done here.

Thursday, January 23, 2014

More Dory Progress

It felt like a bit of a slow start for me yesterday. I started by processing the recesses for twelve hatch latches while Tony worked on the bilge pump installation and rower's seat.

After planing a couple boards down and then chopping them up into smaller pieces, I was able to do a bit of assembly line work to fabricate the seal mounts for the hinged hatches. A coat of epoxy on the wood and then some thickened epoxy for the joints and clamps to hold it all in place while it cured over night.

First thing this morning the hatch doors got a fill coat of epoxy in hopes that it would cure before the end of the day. The top for the rower's seat got fiberglass installed.
The back of the rower's seat was shaped and then got a seal coat of epoxy before lunch as did the wood for the seal mounts for the bulkhead hatches.

After lunch the bulkhead seal mounts were epoxied in place. The clamps will come off tomorrow morning.

By the end of the day Tony had the rower's seat in place and latches were installed in the bulkhead hatches. Before the lights went out, we were able to install the exhaust for the auxiliary propulsion device. The seat back really wasn't designed for the rower, it was designed to camouflage the exhaust.

Hope to flip the boat over by end of day tomorrow so that we can start glassing the hull.


Tuesday, January 21, 2014

A Quick Break

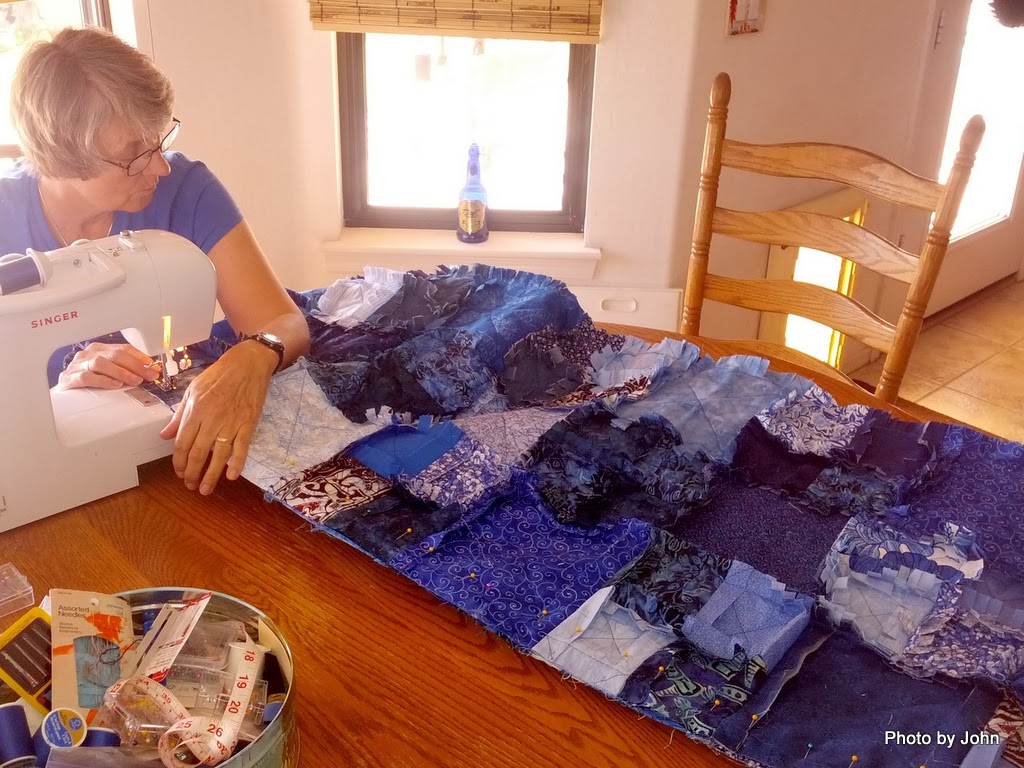
I took a quick break from boat building to show up for a doctor's appointment at home and check in with BJ and Turk. BJ's getting close to finishing what I would call a frayed edge quilt for Kelli & Bryan. Most of the material was collected along the way on our Alaska trip last summer.

Turk visited with the Vet shortly after I got home yesterday. They confirmed that it was a piece of rib that worked its way through the skin near his incision. Apparently it was missed when originally cleaning up his wounds and again when the thoracic surgeon did the second surgery. Amazingly, he seems to be in good spirits and plenty perky except that he doesn't like wearing the shirt to keep him from licking the wound.

I hit the road headed back to Bullhead after lunch. Apparently everyone was in a hurry, even on the two lane portions. Since I didn't have the trailer, I was running the speed limit and being pushed - the picture's not that good but this is what I saw in my mirror at one point.

In addition to the people in a hurry, someone apparently didn't mind an expensive ride. I spotted this Phoenix taxi just south of I-40, over 150 miles north of where you'd expect to see it. The fare was likely headed to Las Vegas since I could see it in the distance northbound out of Kingman.

Tomorrow I'll be back at work on the hatches, installing latches and the sealing surfaces. Meanwhile, Tony has made progress on lots of stuff including the compartment for the bilge pump under the rower's seat.

Sunday, January 19, 2014

Latch the Hatch

For much of the last couple days it didn't seem like we had much progress to show. On Saturday we got the hinges mounted for the two side hatches and got the bottom side and the edges of the hatch lids glassed.

We got the rear seat hatch lid fitted and the trim epoxied in place and figured out the location for the bilge pump and the list of parts needed for that installation. Haven't started fitting the bulkhead hatches yet, but they'll be easier than the hinged lids - I think...

We got fore & aft decks sanded and the the left side hatch glassed before the end of the day. We were pleased to have guests checking out our progress around mid day and the neighbors stopped by at quitting time to check it out and invite us to dinner. Nice!

The next day the back seat was glassed, the fore and aft decks were filled with another coat of resin,

and the right side hatch deck was glassed.

Nice and shiny, but sticky, moving the next projects outside to avoid getting sawdust in the curing resin.

While Tony started working on the splash guard design, I started making jigs for fitting the latches into the deck lids. These latches are something that definitely wasn't on the original boat!

The epoxy finally cured enough that we could start cutting and couldn't resist doing one set. The latches fit, nicely recessed into the hatch lid. It only took two tries on each of two jigs to get them right!
We confirmed that the larger centralised single hatch design works with the original location of the splash guard before quitting - just in time to watch the last quarter of the Seahawks game.

Tomorrow I head home again for a couple days. I'm thinking that about one more long week on this will have worn out my welcome both here and at home.


On a different note for our long-time readers, Turk had a piece of bone about 1/2" long work out through his skin today. A left-over from his mauling in Fairbanks this summer. A vet visit is on the schedule for tomorrow.

Friday, January 17, 2014

Decked!

Thursday was a long day getting the fore and aft decks fitted and installed. Tony had already scarfed a piece large enough for the fore deck and had it drenched with water on both sides while we started on the aft deck. It was nice to be able to crawl through the hatch to mark the position of the inwales, stringer, and other important locations.

We then got the wet 3/8" plywood for the fore deck clamped in place so it could dry and went back to work on the thinner aft deck.

After coating the inner side of the aft deck with resin as additional waterproofing, we got the deck epoxied and screwed in place. 

Trimming the edges was made much easier by Tony's super-duper edge marker and a sharp blade in the sabre saw.

Once the fore deck had dried we did the same process: marked the location of the arch, stringer, inwales, etc.; backdrilled for screw locations; applied resin to the underside of the deck; and epoxied and screwed the deck in place.
After a long day at the office, Helen stopped by to check our progress. The decks really help define the visual lines of the boat.

This morning we started by glassing the aft deck using two layers of cloth to offset for the thinner material that we used for this deck.

Wetting out the cloth makes the fiberglass go clear, letting the wood shine through - at least until the boat is painted.

The fore deck was an easier process since we just used one layer on the elephant's dance floor. Seriously, we do think that this deck is strong enough for elephants to dance on it.

I glassed the floor forward of the rower's station - one piece up and over three ribs to protect from abrasion. Tony started final installation of the side hatch decks

and the permanent portions of the back seat.

At the end of the day the glass on the decks had cured enough that we could cut off the excess at the lower edge of the outwales.

Things will slow down tomorrow. Now that hatch lid sizes can be determined we need to get started on the hatch lids, latches, and sealing mechanisms. Garboards, scupper holes, and the rower's seat are also on the "real soon now" list.