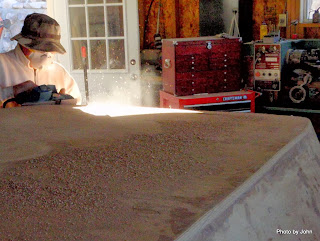
We've made a lot of progress on the dory in the past couple days - much of it not terribly obvious. After filling the screw heads, the boat sat overnight with a heater under it so that the epoxy would cure in spite of the low temperatures we were experiencing. First project the next day was to trim the excess from the plywood bottom. Tony is doing his Mr. Wilson impression.
Once the bottom was trimmed and yesterday's screw head fillings scraped and sanded, we lifted the boat and the strongback into the "flipper" - a pair of engine stands that Tony rigged to allow easy rotation of the boat.
We rolled the boat about 60 degrees so that we could get easy access to all the screws to remove and disassemble (or disassemble and remove or a little bit of both) the strongback.
Lots & lots of screws holding the strongback together but with two guys and two drills, it didn't take too long to get it disassembled.
Getting the boat right side up for the first time was a big step.
After cleaning the excess squeeze-out from ribs / side panels, the entire interior of the boat was sanded before we began the more than one day job of filleting all the joints and epoxy coating all the interior panels.
Once that is all done, the boat will be ready for bulkheads, hatches, and all the rest of the interior fittings. After we finish the epoxy tomorrow, I'll be headed home.
Hope to come back again in early January for glassing.


You two rock. I can not thank you enough for all your hard work. I can hardly wait to see her on Friday when I get back. I know both of you are having a good time.
ReplyDeleteIt has been fun. Next step is bulkheads and locations & dimensions for hatches, deck arch, etc. Too subjective for us to start cutting wood.
DeleteI have friends who decades ago built their own sail boat. Your post gives me an idea of what all was involved.
ReplyDeleteNow they have a DIY houseboat that doubles as a camper.
I am so intrigued by all things boat/ship related. In my dreams, I run away and sail around the world. :)
I'm glad you're enjoying this. I've built kayaks and canoes, but this is the first dory for me. Rather challenging to replicate a historic boat based on some measurements and photos - fair amount of guessing involved.
DeleteWhat a great project!
ReplyDeleteBuilding boats is fun when someone else is paying the bills ;-)
DeleteThat project motto scales well beyond boats. :)
DeleteHello -- was wondering if you did a writeup on the boat flipper anywhere else on your blog
ReplyDeleteNo, I didn't. It was simply two engine stands with custom adapters that bolted onto the bow and stern posts. The trick was getting the angles on the adapters exact.
DeleteThere are a couple pictures on the Jan 15, 2014 post that show the adapter attachment.
DeleteThanks for responding John. I'm not able to comprehend the height issue. All of the engine stands that I have seen range in height from 31 to 34 inches (including casters). These will not accomdate my boat's width of 74 inches. You boat appears to be even wider than mine. What am I missing?
ReplyDeleteJohn, I think I now see -- it appears that you may have inserted an extension bar inside the upright tubing. It looks like that extension might be 8 or 10 inches. That would certainly solve my problem.
ReplyDelete