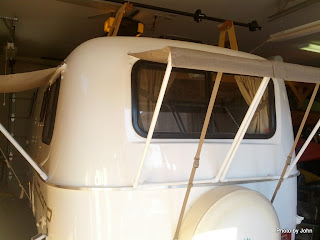
This project has taken longer and was more work than I expected, but it's now complete enough to write the last blog post about awnings. The key to this part of the project was the seamstress.
There's a total of four separate awnings. The left and right sides are the same. The two for the rear window vary slightly, with the left one having a flap that overlaps the right side and connects with velcro. This project confirmed that the rear window and the spare tire are not mounted on the center line of the trailer.
The awning is attached to the PVC frame with loops of strap. A piece of 1 x .125 aluminum strap is sewn into the lower hem to add a little weight and keep the edge straight.
The lower end of the stay strap is hooked to a 3M Command hook.
The rear frames were much more challenging because of the curve of the belly band. I ended up using a tee and a cap for the outer corner to get the offset so that the bottom of the rear frames lined up straight.
We made the rear awning in two pieces so it would fit in the curbside hatch. Each awning frame disassembles into four pieces and is rolled with the awning and strap and then stowed in it's individual bag.
Now we can be in the shade even when we're not.
Part 1 and Part 2 of the project were earlier this month.
Updated April 2, 2013: We discovered that the Command Hook would fail in a brisk breeze. Our solution was the installation of metal hooks fabricated from 100 lb. picture hangars. They are seated with 3M5200 sealant and retained by a single rivet.


Nice. We have vary similar chairs and table in our kitchen. I had to make sure you weren't using my seamstress. Heck, even the sewing machine looks the same.
ReplyDeleteLooking good, John and especially BJ in this case. Thanks to this post the construction details are more clear. Can't wait to see 'em "in situ" on a field test. :)
ReplyDeleteThey turned out better because I got out of the way and let BJ run with the design of the awning.
Delete