Thursday, December 11, 2014

Shiny Bottoms

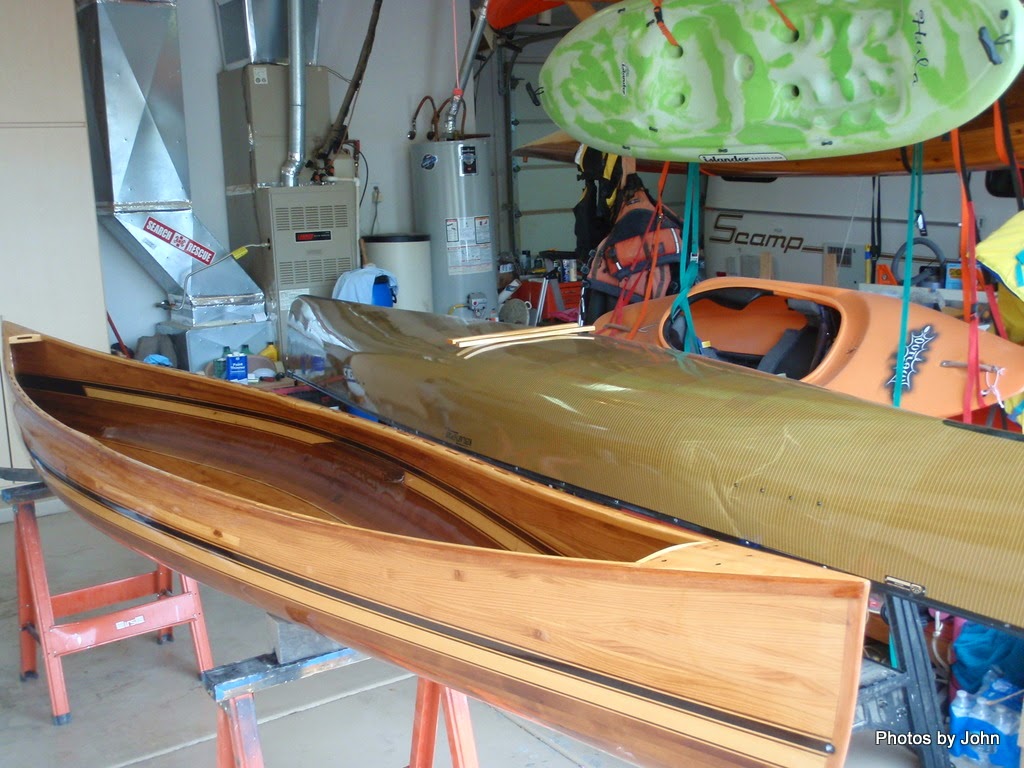
Wood boats are supposed to be shiny, but any boat I use eventually ends up with indications of experience. The varnish is just about gone in front of the seat and the gunnels are showing wear. We won't talk about the scratches on the bottom of the boat...

I removed the seat & thwarts, and then scrubbed the boat to remove the remnants of wax that had been on it at one time.

The last time I refinished this boat I was in a hurry and cheated by using waterborne varnish. Now I'm paying the price. The trick is to sand through the old varnish but NOT into the fiberglass cloth that provides the strength to this style construction.
The gunnels originally had a single application of epoxy without any cloth reinforcement with a varnish finish. The edges of both gunnels near my hips were showing some wear from the paddle shaft occasionally rubbing, so this time I epoxied a couple layers of light weight fiberglass cloth to the outer radius as a sacrificial layer.

After sanding the bottom of the hull, I squeegeed epoxy into the remaining deep scratches

and went to work sanding the outside of my Souris River tandem canoe. It, too, uses clear epoxy with a cloth matrix (in this case, Kevlar) and after a period of time needs to be varnished to protect the epoxy from ultra violet damage. It spent a summer on the truck during our Alaska trip and was really past due for its first varnishing.

Three coats later, the outsides are looking pretty nice. The weather has been cool enough to make for good varnishing weather, warm enough so that it cures well, but cool enough that it can flow while I'm brushing, avoiding brush marks.

We did have a weather abnormality. It rained so I had to kick BJ's car to the curb so that I could bring the boats into her space to finish them up.

It is really hard to get a decent picture with the glare off the gloss, but it's looking much better than it has for the past couple years. I still have the thwarts to install and a seat project, but that's another subject!

Tuesday, December 9, 2014

Scamp Door Seals

Scamp door seals are notorious. The foam seal on the door sill finally died. If I'd been thinking, I would have taken a picture of the dead seal, but I grabbed the scraper instead of the camera and this was the result. Sharp-eyed Scamp aficionados will note that the remainder of the door seal has been moved from the body to the door - more on that later.

I stopped in at Space Age Paint to wander their aisle of rubber seals (available by the foot,) looking for something to replace the stock seal. This is what I selected. It's a GM roof rail seal but more importantly has the right dimensions, and has a smooth, tough, outer skin which I hope will stand up to wear better than the original foam rubber.

I used a piece of trusty 3M Very High Bond (VHB) double-faced tape to attach the new seal to the door sill,

and reinstalled the original strip that serves to keep keep the front corner of the door from binding on the body. I put the smaller wing of the seal on the lower side which may or may not have been the best decision.


I wasn't smart enough to do it the first time, so I went back to town to take a picture of the label on the carton of weatherstrip that I used.

Several years ago I removed the seal that was glued to the door frame and installed a tubular seal that mounted directly to the edge of the door. This seal reduces the problem with the seal binding on the forward lower corner of the door.

Here's a cross section of the seal I use on the door itself. Space Age Paints calls it TS-2. I don't know if that is their nomenclature or if that's an industry standard number. I suspect they may source it from the same manufacturer as the seal that I used on the sill, but I don't know that for sure. This seal has worked very well for us.

Space Age Paint has a small web presence that does not support ordering online. Jeff tells me that they will do mail order, and they sell by the foot instead of just by the carton, so here's his contact info. If you're in the desert southwest, you can stop by, but don't bring your trailer. Their parking lot is VERY unfriendly for trailers!

I have no relationship with Space Age Paint - I just appreciate the weird and wonderful stuff that I can find there!

Sunday, December 7, 2014

I Can See Clearly Now

Since nearly all of the lights in the Scamp are mounted below the upper cabinets, seeing what's in the upper cabinets often involved Braille or a flashlight, especially in those cabinets filled with a bunch of small stuff.

I ended up buying a 5 meter roll of waterproof led strip lights from Amazon. My thought was that I might use some of it for external lighting. These lights are 12 volt, some strip lights are other voltages.

The strip can be cut about every three inches. Waterproof strips have the LEDs encased in a clear silicon bead.

The roll came with a connector pigtail on one end for LE's 110 volt transformer supply. I cut the plug off, and soldered 16 gauge wire into the remaining pigtail. The strip was wired with 24 gauge wire. I couldn't use crimp connectors because of the mismatch in sizes.

Futzing around with the soldering iron and shrink tubing added a bit of time to the project, but I'm sure that I have good connections.

The strip comes with an adhesive backing. I wiped down the inside of the cabinet face frame with isopropyl alcohol and then stuck the strip in place along the top edge of the cabinet face.

Amazing what a little light will do! Now I can figure out what spices I'm reaching, etc. In this installation, I used 36 inches of led strip to light up the two cabinets over the stove and sink.

I didn't want to have a switch on the cabinet face, so I inset a switch on the bottom of the cabinet, hidden behind the face frame. It's easy to reach if you know where it is located.

While much more efficient that incandescent lights, the 36" strip does draw 6 watts. It draws 3 times more power than one of our LED reading lights (but just 1/3 of a single incadescent,) but this light won't get used for long periods.

Using additional short strips was a bit challenging. The silicon bead had to be removed from the backing in order to install a connector. The non-weatherproof type strip would not require that surgery.

The small connector was designed to connect two LED strips together. I should have ordered some connectors with pigtails attached, but who wants to wait for the brown Santa when you have a soldering iron handy?

All this extra effort so I could add a light to the cabinets that holds our games and my personal "stuff" on the other side of the trailer.