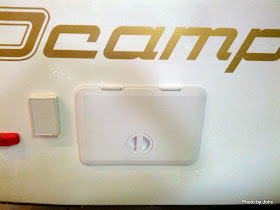
Over a year ago, I installed a hatch for access to the curbside dinette bench. We decided this summer that we should install a matching hatch on for the streetside dinette bench as well.
This one also required some equipment moves. In this case, the city water connection needed to move forward to give enough clearance for the hatch between the city water connection and the power cord connection.
As I did last time, I used a laminate trimming router with a straight bit to cut through the fiberglass and just into the insulation. This approach results in a very clean cut without any chipping of the gel coat.
With the fiberglas out of the way, it was simple to cut the insulation with a box cutter and the rat fur with scissors.
Once the big hole was open, I was able to install the modified plumbing for the city water connection. Just added a couple PEX elbows so that I could continue to use the original tee.
The frame for the hatch was seated with 3M5200 sealant and attached with 3/4" long stainless steel pan-head screws, flat washers, and nuts.
I made a guard structure to go around the circuit breaker panel and the wall mounted converter to keep other stuff from creating problems with the electrical wiring while allowing good air flow.
With the hatch installation finished, we now have an easy spot to store the trailer's lego blocks, chocks, hoses, connectors, etc.


Beautiful job! :)
ReplyDeleteThanks! Easy, quick, and very handy!
DeleteGreat job!!
ReplyDeleteThanks! - BTW, it looks like you're enjoying your egg! Beautiful pictures!
DeleteNeat ideas with the two hatches. Excellent Job! Your a true craftsman.
ReplyDeleteWe have a 16' Scamp as well. Just found your link over at the Bayfield Bunch.
Safe Travels.
Thanks! The key is to keep the hatches small enough to avoid problems with the curvature of the egg.
DeleteThis is simply amazing to me! Keep up the good work and you will find people on your doorstep begging for your expertise.
ReplyDeleteHappy to help you if you're in the neighborhood!
Delete